Assertion: All non-trivial algorithmic code should be contained in a library. Rationale: This allows reuse in future projects, thorough testing in a controlled context, and fine-grained control of revisions via version numbering.
Writing libraries requires that the code can be executed somehow as it is developed, as code rarely works first time. And code that lives in a library carries with it a not unreasonable expectation that it works correctly. The best way of achieving this is with unit tests running in some sort of framework.
To this end, I wrote a unit test library a few years ago (https://github.com/RedRockControls/SimpleUnitTestLibrary), and have used it since on many libraries and projects. However, I never found a satisfactory way of making units tests easily portable between the library and the project in which the library was to be used, and using the PLC visualization to show test results introduced too many dependencies. Hence the new library (https://github.com/RedRockControls/tcl_TwinCAT_UnitTestLibrary)
The aim of making unit tests easily portable is to allow the tests to be written and used in the library project during development, and in the client code when the library is to be actually used in a project.
Running the test in the library project means you are not continually creating the library and switching to another project to run the tests. And if the tests can run automatically on an online change to the code, then fast feedback is possible. This is especially useful when practicing Test Driven Development (TDD).
Running the same tests in the client project means that the library code is tested in the actual context in which it will be utilised – i.e the same hardware platform and libraries (ARM processors do not behave identically to x86 processors!)
Using The Library
Creating a unit test
A unit test can be any function block that extends the function block T_UnitTestBase. The test is defined as follows:
The Init method is overridden with initialisation code to be executed before the test code is executed
The RunTest method is overridden with the test code that executes the test and writes to the two output variables – TestFailed and TestCompleted
So a test can be run just by executing the Init method to perform any initialisation required, then executing RunTest until TestCompleted is TRUE. We can then inspect the TestFailed output to determine the result of the test.
However, what we really need is a collection of unit tests that can be executed automatically on an online change to the code. For this, we need a Test Suite
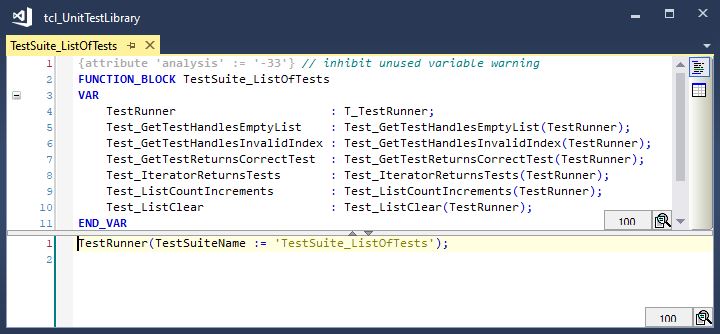
Test Suite
An example of a test suite is shown below:
A test suite is function block that holds a collection of unit tests and a test runner. The test runner instance is passed into the declaration of each test. This is required so that the unit test instance can be added to a list of tests maintained by the test runner.
The test runner is executed in the main body of the Test Suite. This executes each unit test sequentially when an online change to the code is detected. The name of the test suite is passed to the test runner so that messages posted to the error window of Visual Studio can be identified accordingly. An optional boolean parameter ‘Verbose’ can also be passed in. If true, then test results for each test are posted to the message window as each test completes.
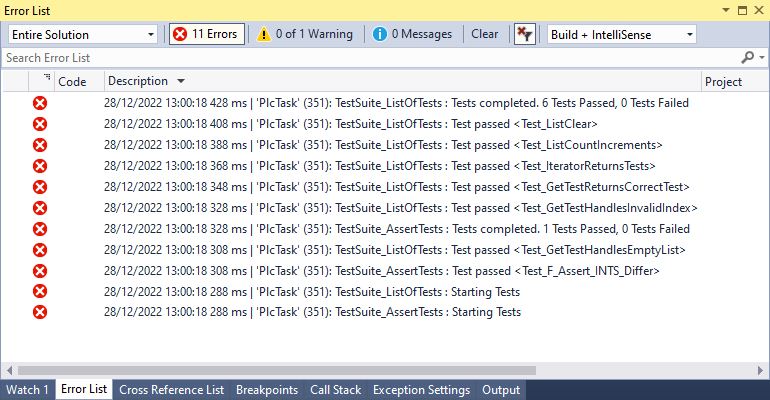
Results with Verbose TRUE:
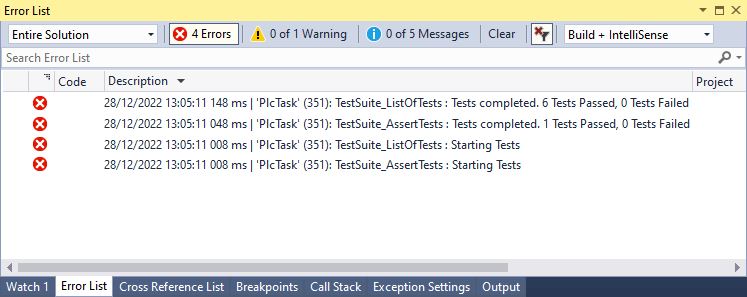
Results with Verbose FALSE:
Portability
So now we have a function block defined in a library that contains unit tests and a means of running them. This means we can run the tests from the client project by declaring an instance of the test suite and executing it.
Even better is that if the library is extended to include new functionality, and unit tests are added to the test suite to test this new functionality, then these tests will propagate to the tests in the client project when the library reference is updated.
Assertions
Assertion functions are available to test the correct operation of the code under test. If the assertion fails, it posts an error message to the Error List and sets its Failed output. This can be used to set the TestFailed output of the RunTest method.
The following assertions are defined in the library:
AssertTrue – asserts that the boolean input parameter (Condition) is true
AssertEquals – asserts that two input parameters of type ANY (Expected and Actual) are identical in type, size and content.
AssertNearlyEquals – asserts that the absolute difference between two input parameters of type LREAL (Expected and Actual) is less than the value of a third input parameter (Delta). This is to make the test insensitive to rounding errors in floating point calculations.
Known Issues
If a unit test is added to a test suite, the code must be downloaded to the runtime – no online change is possible. This appears to be due to a bug in the way nested function blocks are initialised. If an online change is attempted, an error is raised : Error Function ‘FB_init’ requires exactly ‘3’ inputs.
This blog post is a follow-on to a previous post on implementing domain events (found here). I have replace all references to “events” with “notifications” to avoid confusion with the TwinCAT Eventlogger3 events.
The previous post described a synchronous mechanism for sending notifications from one POU to another. The synchronous behavior means that when a notification is raised during the execution of the POU, the code in the notification handlers of the client POUs executes there and then, in the context of the current POU (i.e in the same task).
Where all POUs share the same context (i.e are called by the same task), there is no risk of inconsistency in the state of the client POUs, as there is no concurrent access. However, if we need to use notifications to pass messages between POUs executed by different task, there is a risk of data inconsistency caused by this concurrent access. The mechanism described below provides a way of removing this risk by enabling a notification raised in one context to be handled in another.
As a side benefit, this solution is much simpler to use. It only requires a single class for notifications and a single class for notification handlers: no sub-classing is required to define different types of notification, just separate instances of these classes.
Recap – Domain Events
The notification mechanism we are discussing is an implementation of Domain Events. It allows the consistent update of POUs of a program based on things that have happened in other unrelated POUs.
The mechanism is based on the publisher/subscriber model:
Subscribers register with a publisher.
The publisher raises a notification when something interesting happens.
Each subscriber receives the notifications, and updates accordingly.
The main benefits are: 1. It allows decoupling of classes as the publisher class needs to know nothing about the subscriber classes. 2. It allows one-to-many communication as multiple client objects can subscribe to a single publishing object. 3. It allow many-to-one communication as a single client object can subscribe to the same notification raised by multiple publisher objects. 4. It allows many-to-many communication – for example many objects can receive a Reset message that is raised by multiple sources (different controls stations or HMIs, etc)
Overview – A Simple Example
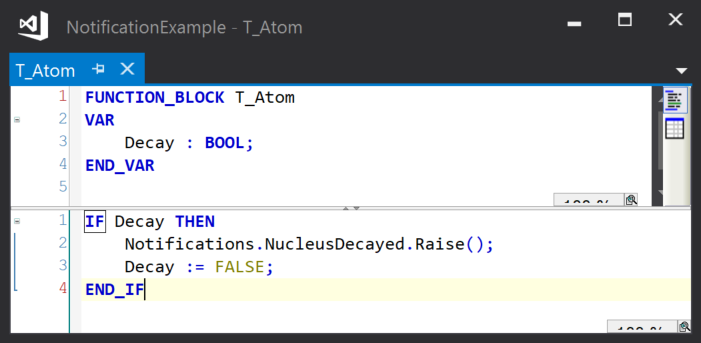
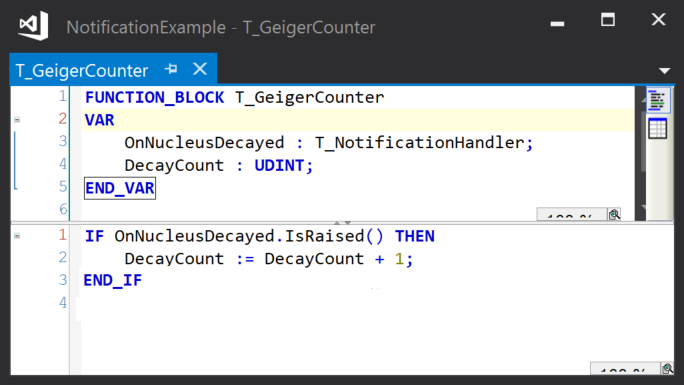
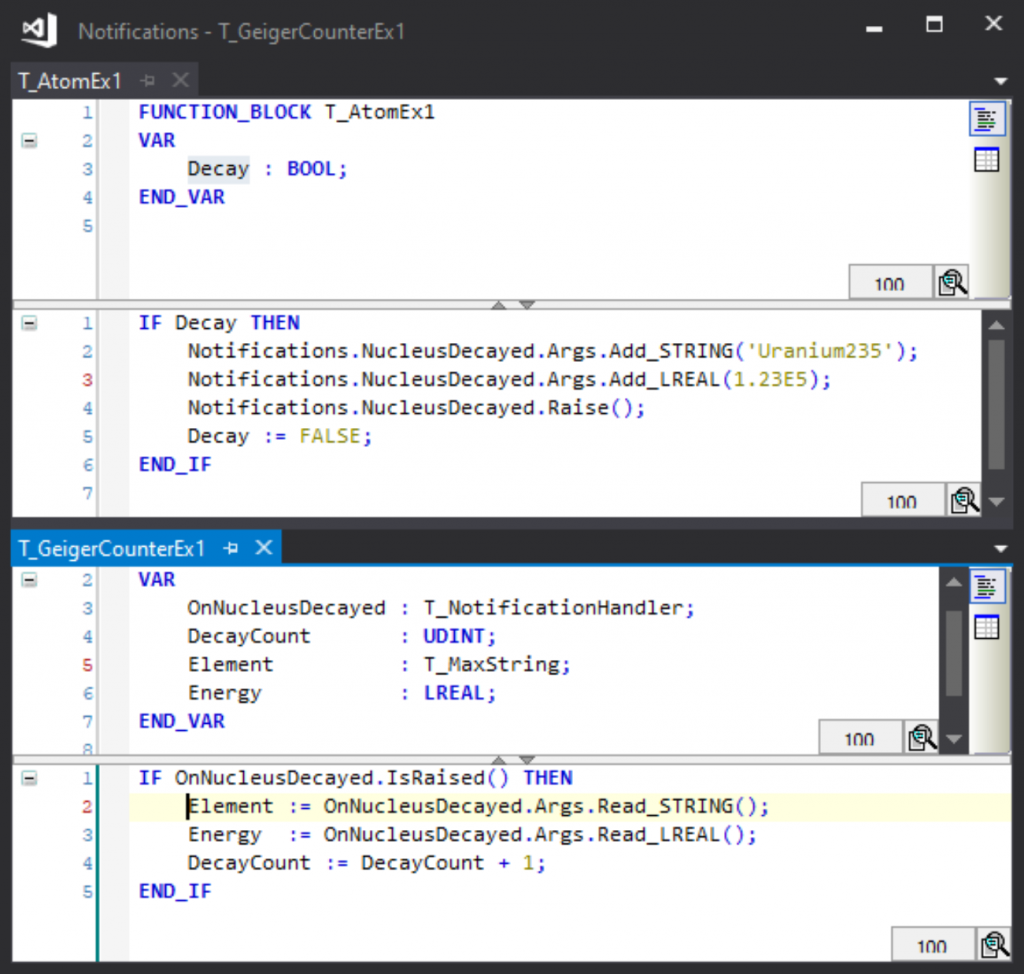
The notification represents something interesting happening. Here, a notification is used to indicate that a radioactive nucleus has decayed:
This is handled by a Geiger counter to count the decays:
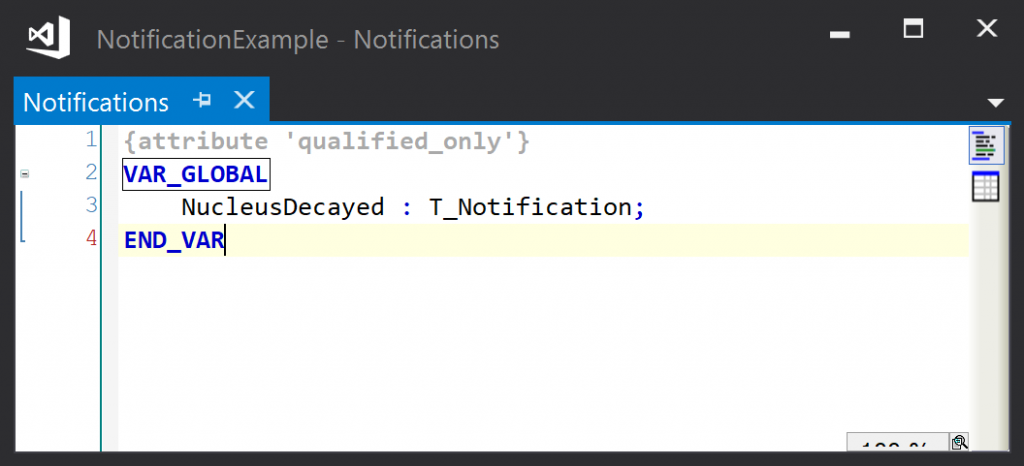
The notification is an instance of T_Notification. Here it is declared in a global list, but it could be a local variable of the publishing class:
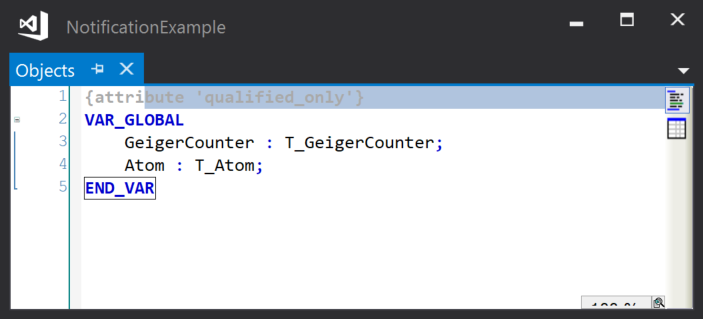
Instances of the publisher and subscriber classes are declared in a global object list:
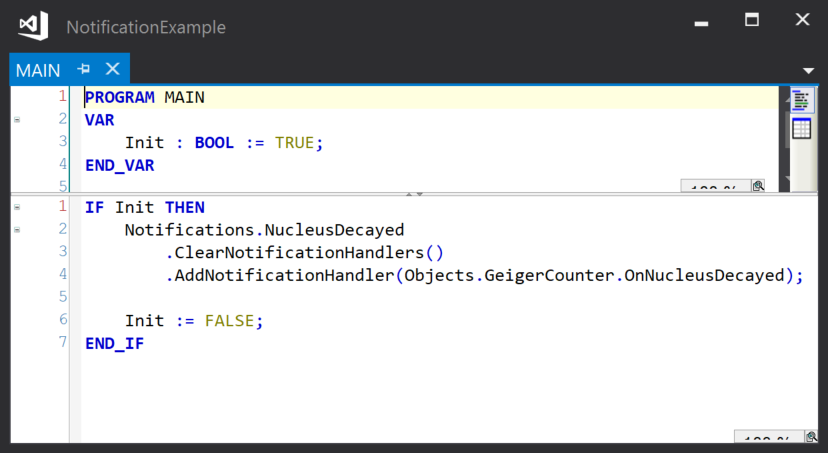
And the notification handler is linked to the notification during initialisation:
The result being that when the atom decays, the Geiger counter increments.
Notifications
A notification is an instance of the T_Notification class.
Each notification holds a list of notification handlers. Notification handlers are added to this list during program initialization.
Notifications can be declared either as local variables of a publishing object, or in a global list of notifications. A global list of notifications produces a more readable program, at the expense of making POUs harder to test (as it introduces a dependency on global variables).
Notifications have an arguments property that can be used to attach values to the notification by calling methods such as Add_Byte, Add_UDINT, etc. before raising the notification.
The notification’s Raise method iterates through the list of handlers, copying the arguments and calling the raise method on each handler.
Notification Handlers
A notification handler is an instance of the T_NotificationHandler class, declared as a local variable of a subscribing object.
Notification handlers also have an arguments property that is used by the subscriber to read any values that were attached to the notification by calling methods such as read_Byte, Read_UDINT, etc.
Notification handlers implement an IsRaised method. The subscribing object checks the state of the notification by calling this method and checking its return value – if true, it can then query the notification arguments and update its state.
Synchronisation between tasks
The notification object is only accessed by the publishing object, so there is no concurrent access to the notification.
The notification handler object is accessed by the notification object and by the subscribing object, so access to local variables must be synchronized, here using an instance of the FB_IecCriticalSection function block as follows:
When the notification is raised, the RaiseNotification method calls the Enter method of the critical section object. It then writes the notification arguments (if any) to a private copy and sets the Raised state of the notification handler. It then calls the Leave method of the critical section object
While the notification is handled, the IsRaised method calls the Enter method of the critical section object. It then checks the Raised state of the notification handler. If it is raised, it writes the notification arguments from the private copy to a public copy that can be accessed by the subscriber object. In either case, it then clears the raised state of the notification handler.
Notification Arguments
Notification arguments are stored using instances of a memory stream class T_Stream. This class has methods to write data to the stream sequentially (Add_BYTE, Add_UDINT, etc), and to read data from the stream sequentially (Read_BYTE, Read_UDINT, etc). The T_Stream class is initialized with a default length (8 bytes), but will automatically resize as data is added.
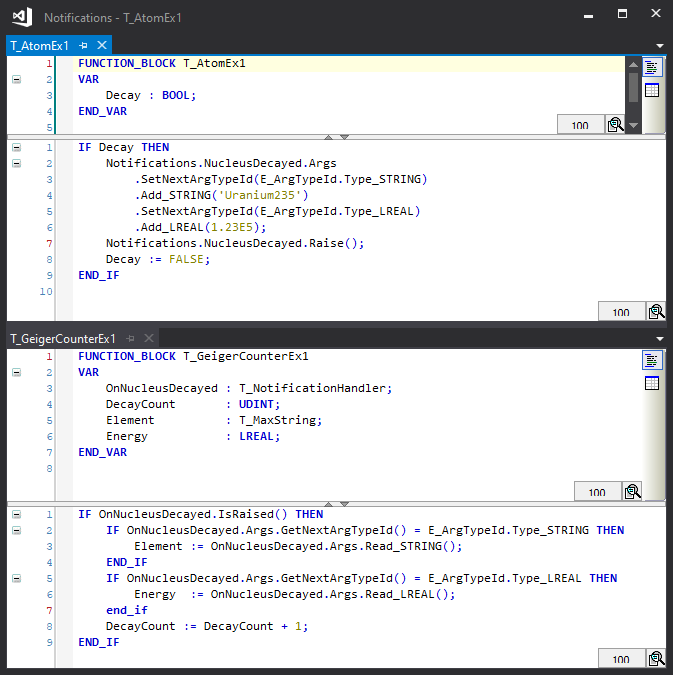
Here we modify the previous example by adding a string value and a LREAL value as notification arguments:
Additionally, a pair of methods (SetNextArgTypeId and GetNextArgTypeId) are implements so the type of each argument can be written to the stream before writing it, and read from the stream before reading it to ensure the type read by the subscriber matches the type written by the publisher:
Summary
Notifications and handlers are easy to create, and the benefits of decoupling events from their effects can be significant for large projects.
Additionally, they open up the possibility of writing library classes that raise custom notifications that can be handled in client code without introducing dependencies between the library code and the client code.
One further benefit of this design is that it provides a convenient way of exchanging data between tasks, as it takes care of the data synchronization as part of its implementation.
A previous post discussed the benefits of using the command pattern to provide a service class with a safe and convenient way to allow other objects to invoke and monitor a sequence of operations (a service). This post describes an implementation of the command pattern that uses a class (T_Execution) that implements an interface (I_Execution). The source code for an example project can be found here. The Execution classes and interfaces are defined in the library tcl_BaseClasses. The source code for the library can be found on git hub here
The T_Execution class keeps track of the execution state of the service, and has methods to update the execution state and properties to show the current execution state in a convenient form. An instance of T_Execution is declared as an instance variable of the service class, and an interface pointer of type I_Execution is made available to the client code via a property
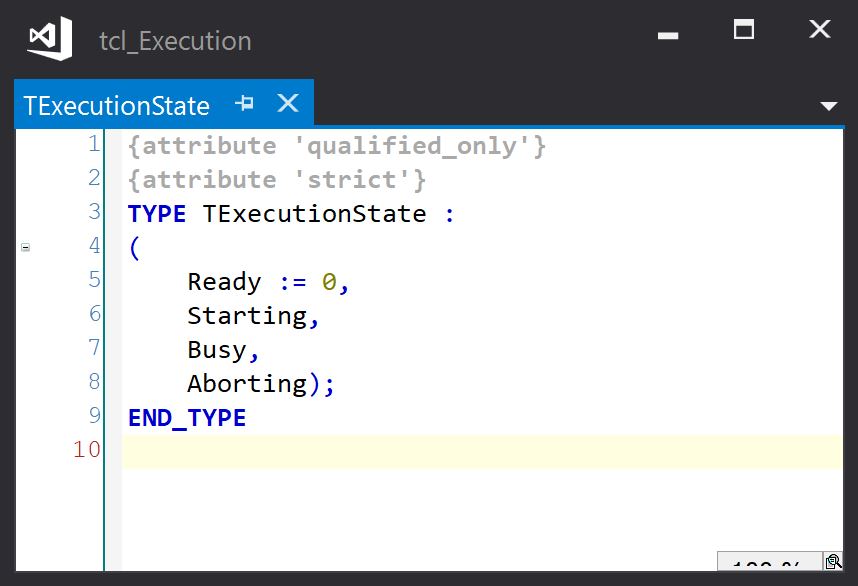
The execution state is held in the T_Execution instance by an enumerated value (T_ExecutionState), defined as follows:
Ready indicates the service is not currently executing.
Starting indicates that there has been an external request to start the service, but the service has not yet been initiated.
Busy indicates that the service is currently executing.
Aborting indicates that there has been an external request to cancel the current service, which should be handled internally to cleanup and return to a ready state.
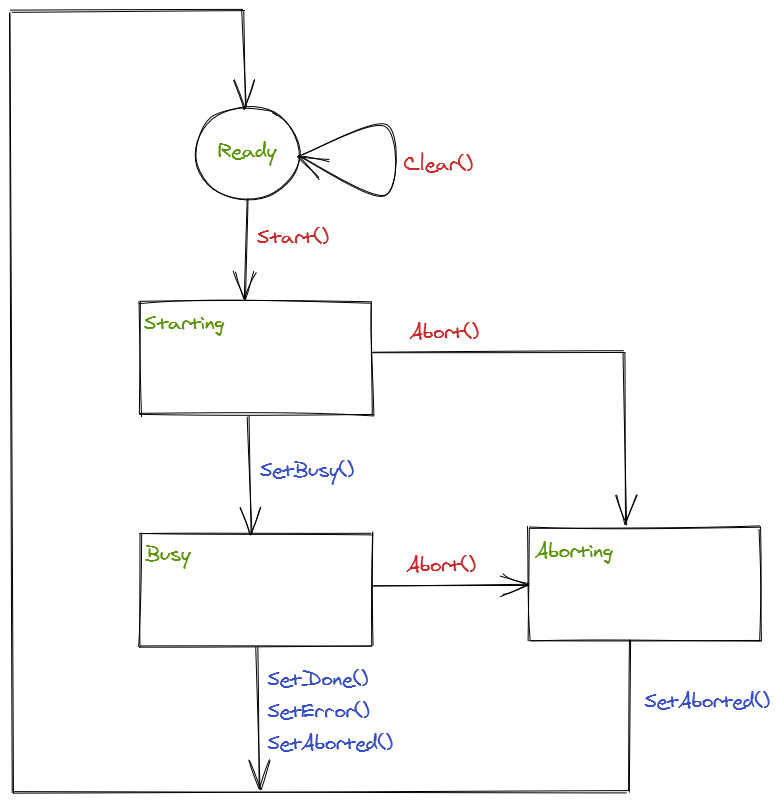
The state machine is shown below. States are shown in green, methods called by the client via the I_Execution interface are shown in red and methods called by the service implementation are shown in blue:
I_Execution Methods
The I_Execution interface is the interface provided to the client code to allow it to start and abort the service, and to clear the results.
The following methods are implemented:
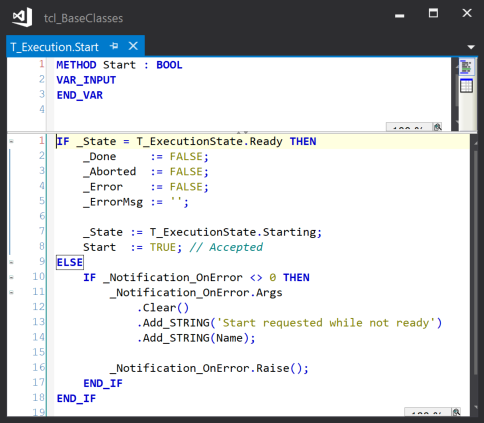
Start()
If the current state is Ready, the result flags are cleared and the current state is set to Starting to request execution of the service. True is returned to signal that the start request was accepted.
If the current state is not Ready, a notification is raised to provide a notification that the state was not the expected state, and False is returned (see later for a description of the error and aborted notifications)
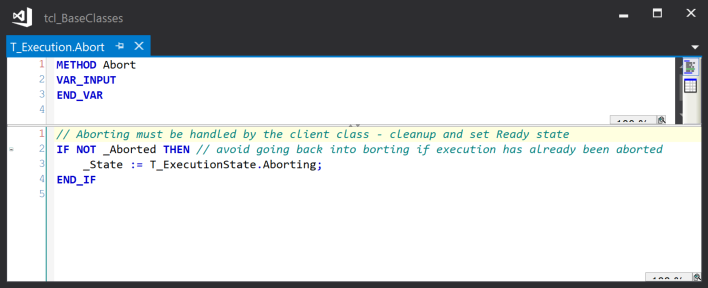
Abort()
If the current state is not Aborted, then the current state is set to Aborting. Otherwise, the abort is silently ignored.
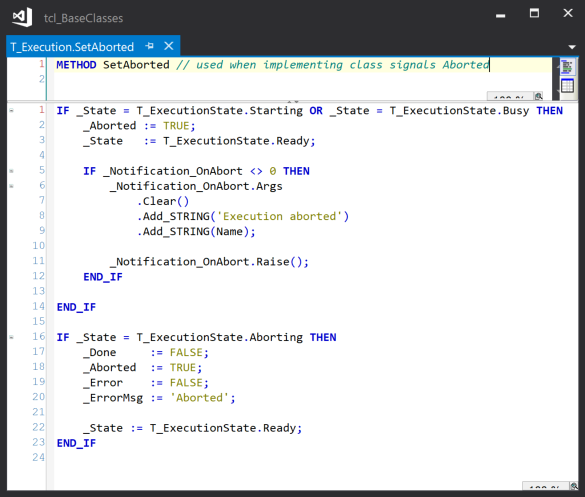
This method provides the calling object with a way to interrupt execution of the current operation and return it to a ready state. For this to work, the implementing class must detect the Aborting state and cancel its current operation. Once cancelled, it signals the completion of the abort using the SetAborted method which returns the current state to Ready:
The SetAborted() method can also be used where the implementing class aborts the operation (for example, a motion operation may be aborted by the NC). So if the current state was Busy, a notification is raised to indicate that the service was aborted internally (see later for a description of the error and aborted notifications)
Clear()
The Clear method can be used to clear result flags, provided the current state is Ready. If the current state is not Ready, a notification is raised to indicate that the state was not in the expected state (see later for a description of the error and aborted notifications)
Methods not belonging to I_Execution
The following methods are provided to allow the service class to update the current execution state. They are excluded from the I_Execution interface as the state transitions they trigger need to be restricted to the service class implementation:
SetBusy() – If the execution state is Starting, the Busy state is selected to indicate that the operation has started
SetDone() – Sets the Done property and selects the Ready state to indicate that the operation has completed successfully
SetError(ErrorMsg) – Sets the Error and ErrorMsg properties and selects the Ready state to indicate that the operation failed to complete successfully. A notification is raised to provide a notification that an error occurred.
SetAborted – Sets the Aborted property to indicate that the operation was aborted and selects the Ready state. A notification is raised to provide a notification that the current service was aborted.
The following read-only properties are defined:
Ready (BOOL)- current state is Ready
Busy (BOOL) – current state is Busy
Done (BOOL) – last operation completed successfully
Error (BOOL) – last operation terminated with an error
ErrorMsg (STRING) – error message describing the last error
Aborted (BOOL) – last operation was aborted
Notification_OnAbort – Interface pointer to the OnAbort notification. By default, this points to a global notification object in the GVL GlobalNotifications, but can be set to zero to inhibit the instance from raising the OnAbort notification
Notification_OnError – Interface pointer to the OnError notification. By default, this points to a global notification object in the GVL GlobalNotifications, but can be set to zero to inhibit the instance from raising the OnError notification
The I_Execution interface that is available to the client class is exposed via a read-only property:
Because interfaces are reference types, we can access methods and properties directly on the interface property. i.e. External code can initiate the operation by calling Start() via the I_Execution interface, and check the progress of the operation by querying the state of the Busy, Done and Error properties.
Notifications
Every instance of T_Execution has the ability to raise a notification when its SetError or SetAborted method is executed, or when the Start method is executed while the execution state is not ready. This is very useful when testing the software on a machine. See this post for an explanation of the notification framework.
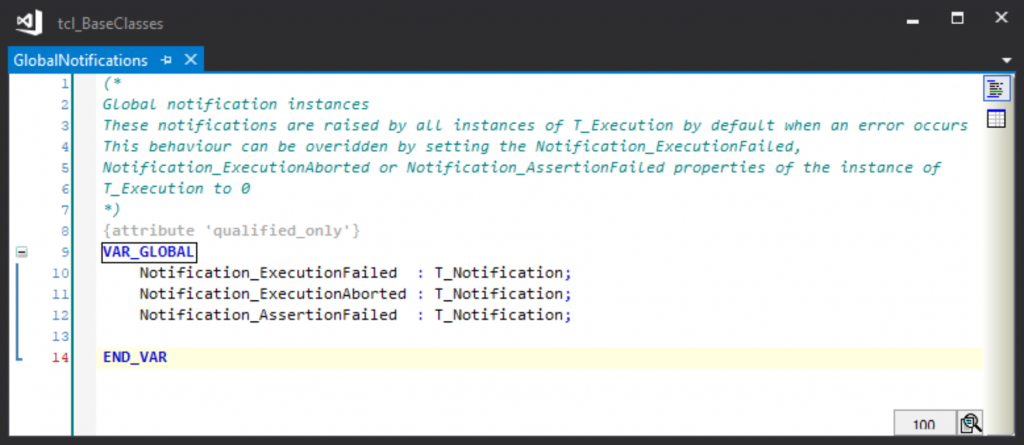
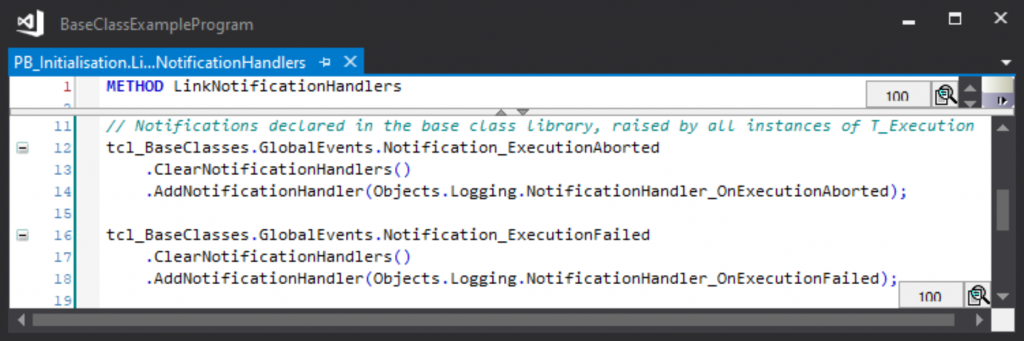
The library that implement T_Execution has a global variable list called GlobalNotifications. This holds a set of notifications: Notification_ExecutionFailed Notification_ExecutionAborted Notification_AssertionFailed
Each instance of T_Execution holds references to these notification instances, allowing them to raise the notification as necessary. These references are intialised in the FB_Init method of T_Execution (and can be zeroed via the associated property to inhibit the notification from being raised).
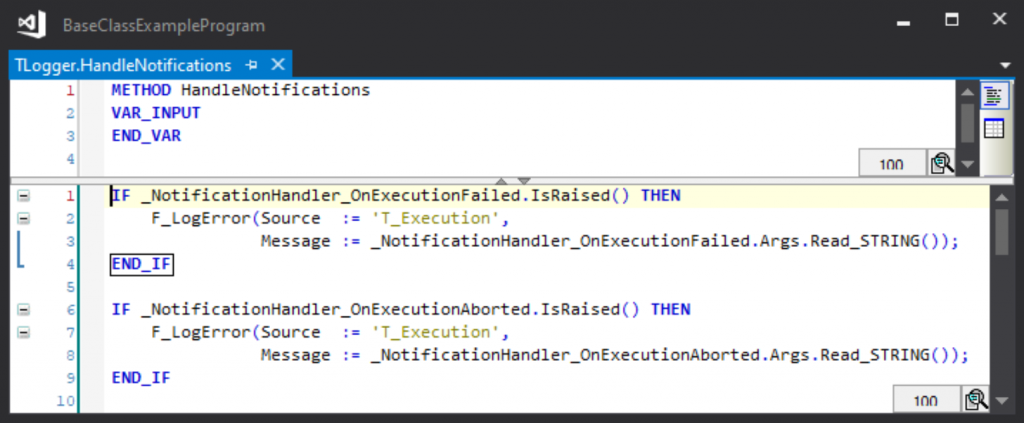
These notifications can be handled by instances of T_NotificationHandler in an external class (a Logger class, for example) which can then be used to send error messages, etc:
The Logging object is linked to the execution notifications as follows:
So with a few lines of code, all execution errors and aborts can be directed to a single destination for analysis.
Client Execution Methods
The implementing class (that holds a T_Execution instance) can provide access to the execution object via a property of type I_Execution. This property can then be used to call the Start() method of the execution object, and to query the Done, Error and ErrorMsg properties of the execution object.
Where the implementing class requires some parameters to execute the service, this can be achieved by adding a method with the required parameters as inputs. This method writes the parameters to the implementing class then calls the Start method of the execution object. If this method returns an interface pointer to the execution class, this can then be used by the client code to query the state of the execution.
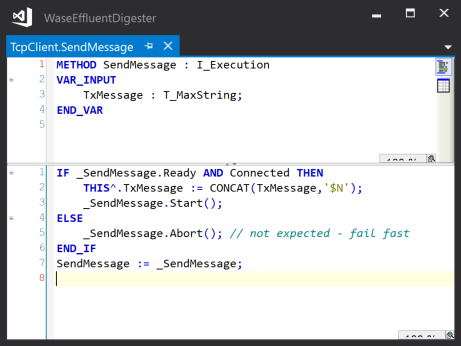
For example, in a class that implements a TCP client connection to a server we could have an execution object (_SendMessage) that controls the execution of the sending of a message to the server. Access to this execution object is via a public method SendMessage() that takes the message to send as a parameter. This method stores the message in an instance variable, then calls the Start method of the _SendMessage object to trigger the sending of message, and returns an interface pointer to the execution object.
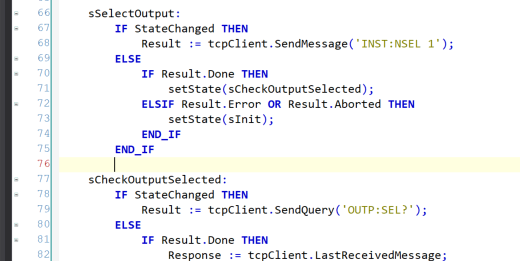
This return value is stored by the calling class in a variable Result of type I_Execution, that can then be queried by the calling class to determine the result of the Send operation:
Summary
The T_Execution class can offer a consistent and safe way for classes to provide an API to the operations they implement. It can track the state of an operation, provide a mechanism for aborting the operation and returning the class to a known state, and can provide diagnostics across the entire program to track errors in the execution of operations.
This blog describes an event framework that implements domain events.
The example code shows the creation of events TEvent_OnEStopTripped and TEvent_OnEStopReset, handled by class implementing the interfaces IEventHandler_OnEStopTripped and IEventHandler_OnEStopReset. The base classes and interfaces are defined in the library tcl_BaseClasses, and the open-source project for this library can be found at https://github.com/RedRockControls/tcl_BaseClasses
Domain Events
The event mechanism we are discussing is a simple implementation of Domain Events. It allows the consistent synchronous update of the state of a program based on things that have happened, and is based on the publisher/subscriber model.
Events and Handlers
Each event class defines an event of a particular type, and has an associated event handler interface definition. This interface defines the name of the method to be executed when the event is raised.
If a class is to handle a specific event, it must implement the event’s associated event handler interface (i.e it must implement a method with the correct name and signiture).
During an initialisation phase, any objects which must receive a notification of an event are added to the event’s list of subscribers.
When the event is raised in the course of the program’s execution, the event object iterates through its list of subscribers and calls the event handler method of each in turn. This means that the event handling code in the subscribing objects is executed there and then 1
The publishing class knows nothing of the subscribing class – the only thing that links them is the event handler interface. They could each be defined in separate projects, with the event and event handler defined in a third project..
Defining an Event handler
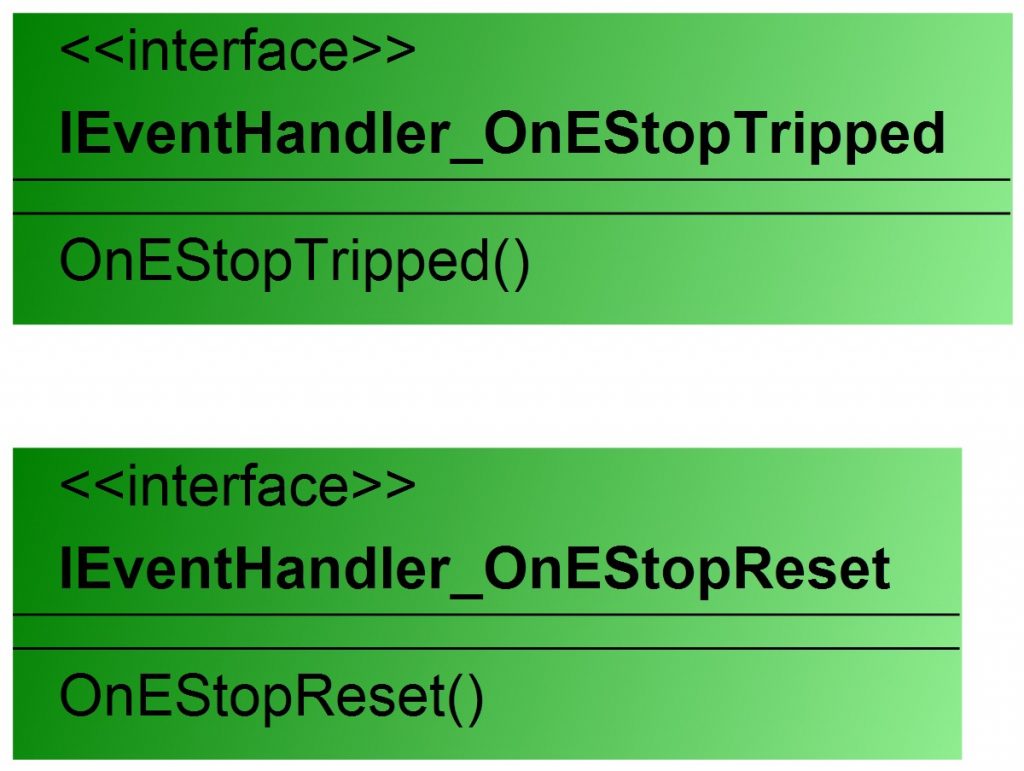
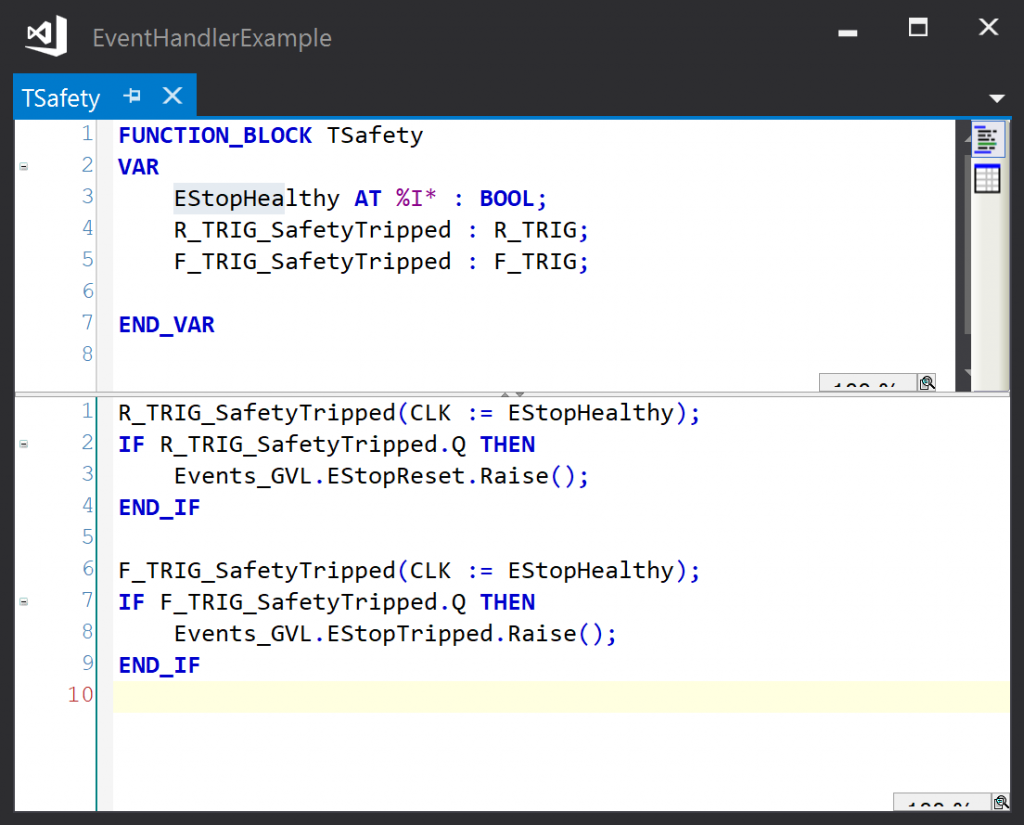
An event handler interface is defined by creating an interface that extends a base interface IEventHandlerBase, and adding a method with the required name and signature. For example, to implement an EStopTripped and an EStopReset event we need to define two event handler interfaces that extend IEventHandlerBase, each with one method to be executed when the event is raised:
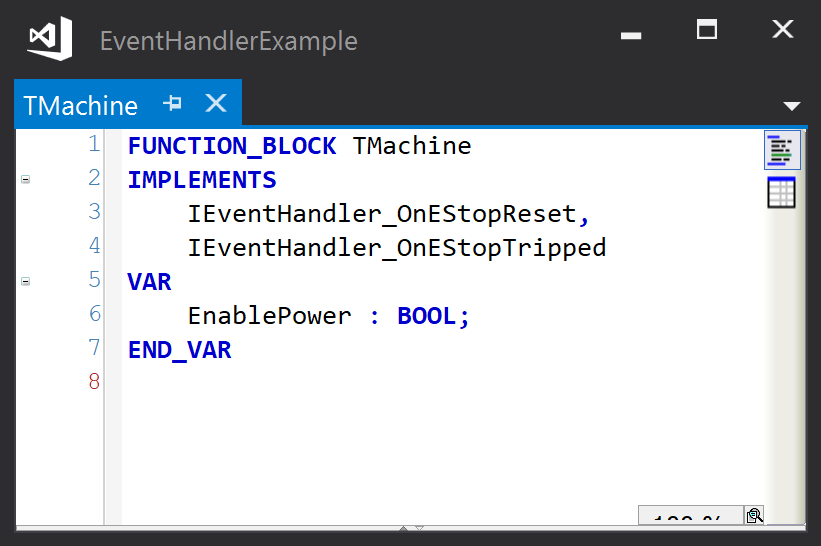
In the example project, the events are to be handled here by a class TMachine, so this class must implement the event handler interfaces:
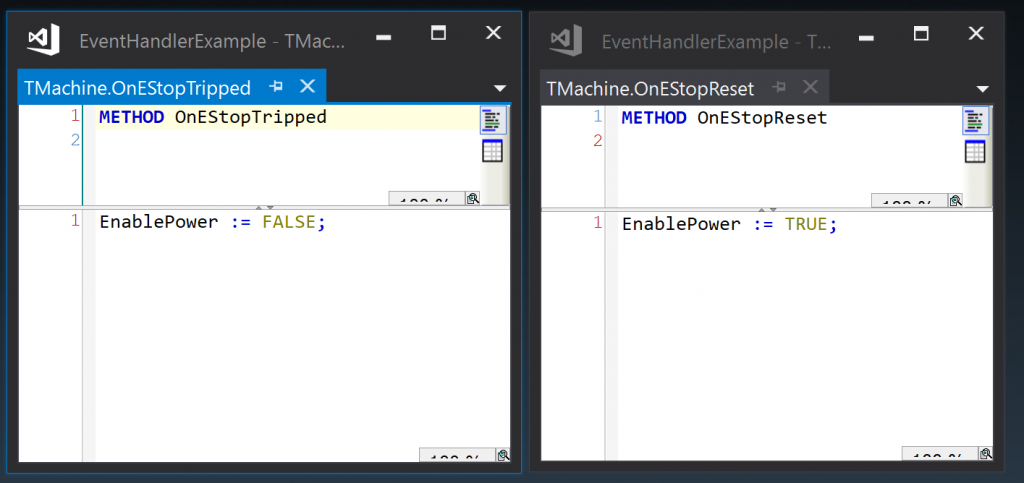
In the example project, the actual event handler methods implemented by TMachine just set or reset a boolean variable:
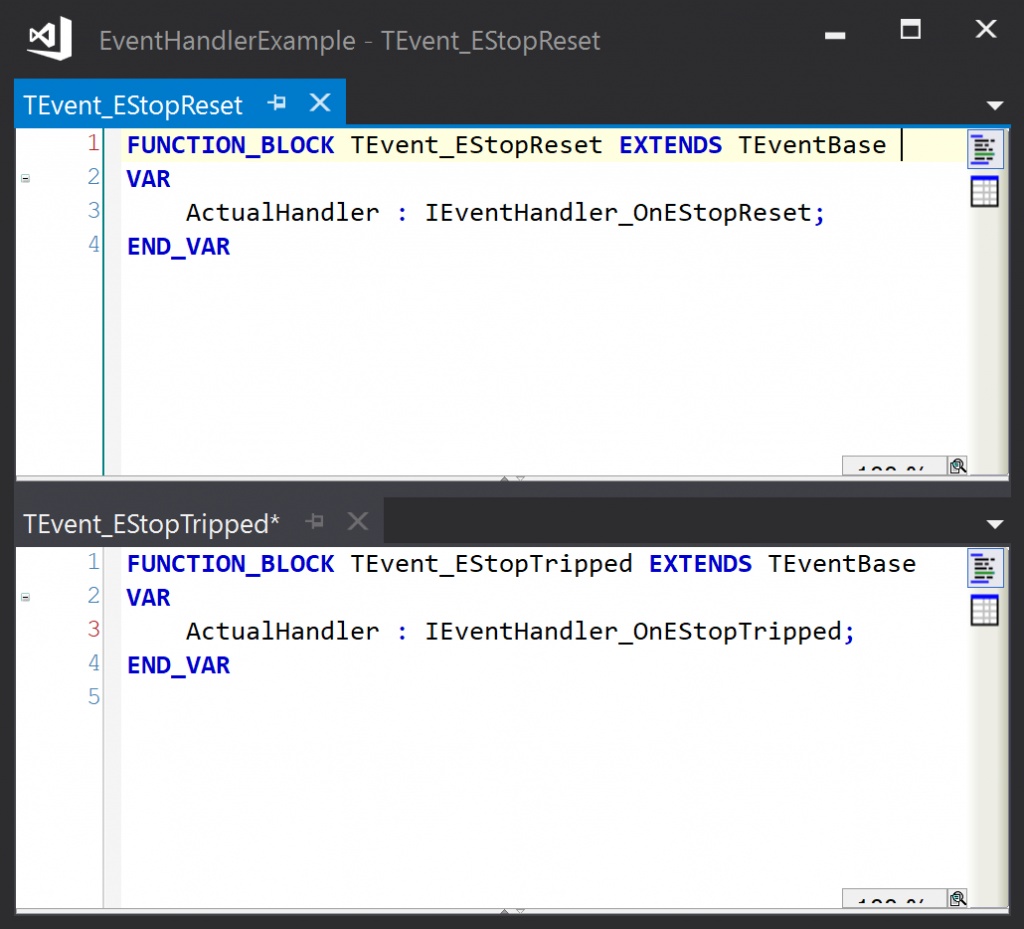
Defining an Event class
Event classes are defined by creating classes that extend a base class, with an instance variable that can hold a reference to the appropriate event handler. For example:
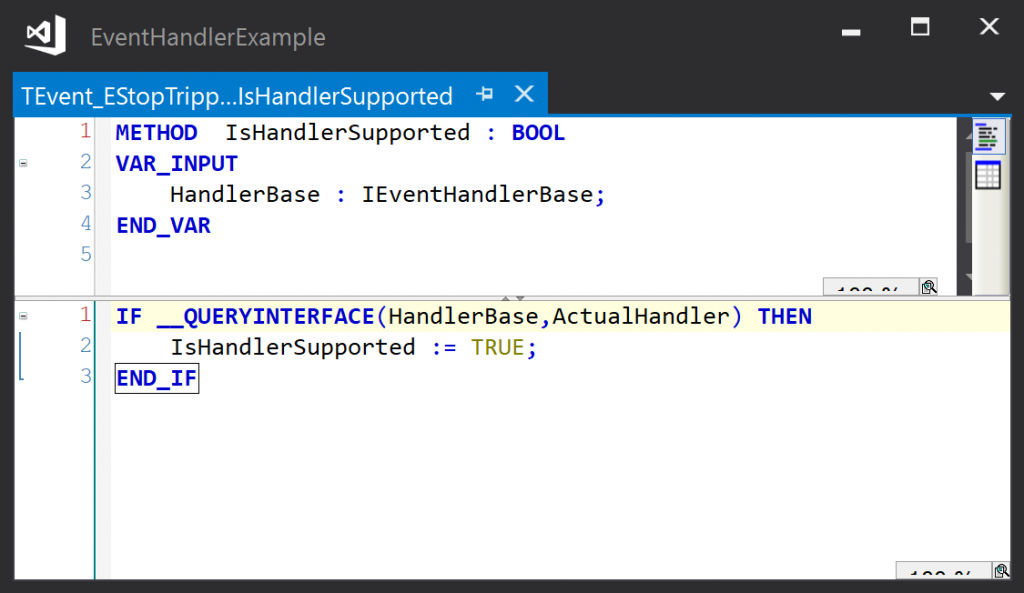
Each event class needs to override two abstract base class methods.
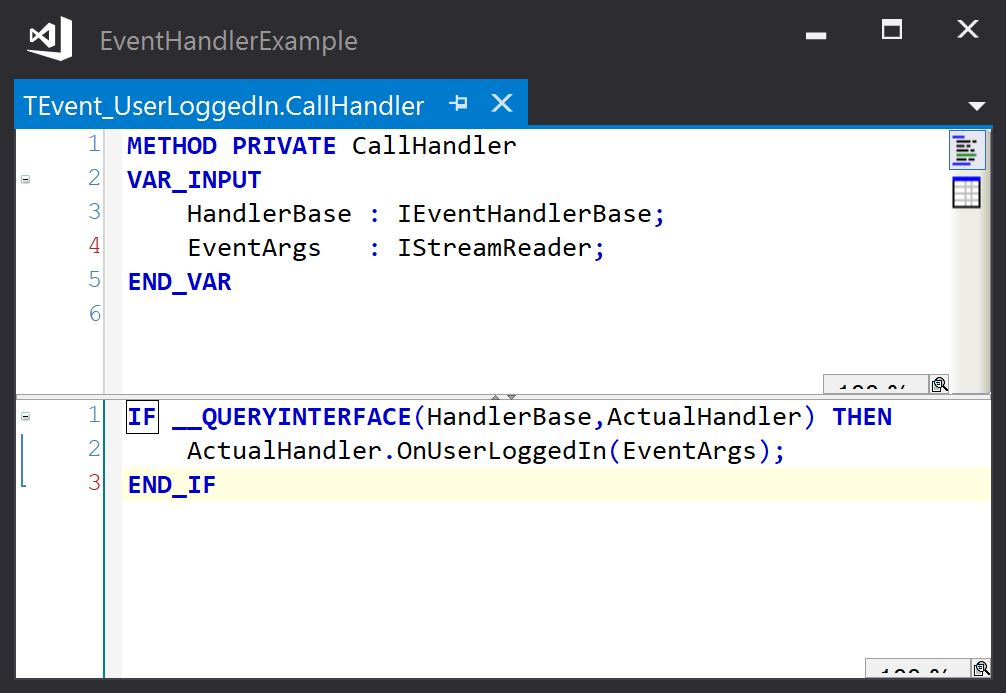
The IsHanderSupported method is used by the base class’s AddHandler method to check that the object passed to the method implements the required event handler interface for the event. This method is always as shown below – there is no variation between event classes:
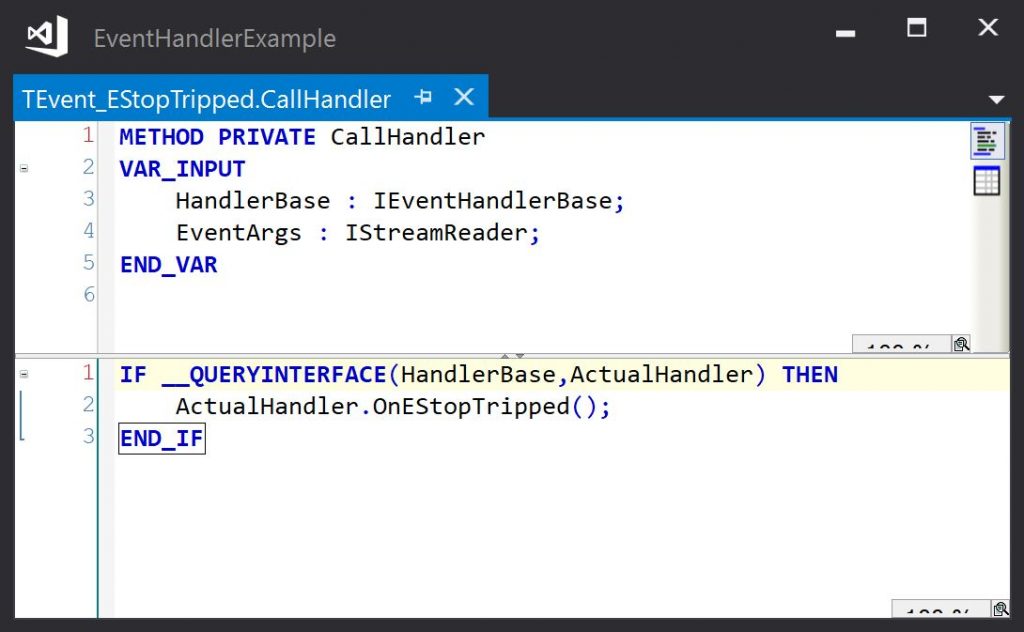
The CallHandler method is used by the base class’s Raise method to call the event handler method implemented by the event handler. It casts the interface pointer passed in to the actual event handler interface and calls the event handler method. The EventArgs parameter is used if event data is to be passed to the handler method – this is explained in a later section. This method will be slightly different for each event class – the event handler method name will be that defined in the event handler interface.
Linking Event Handlers to Events
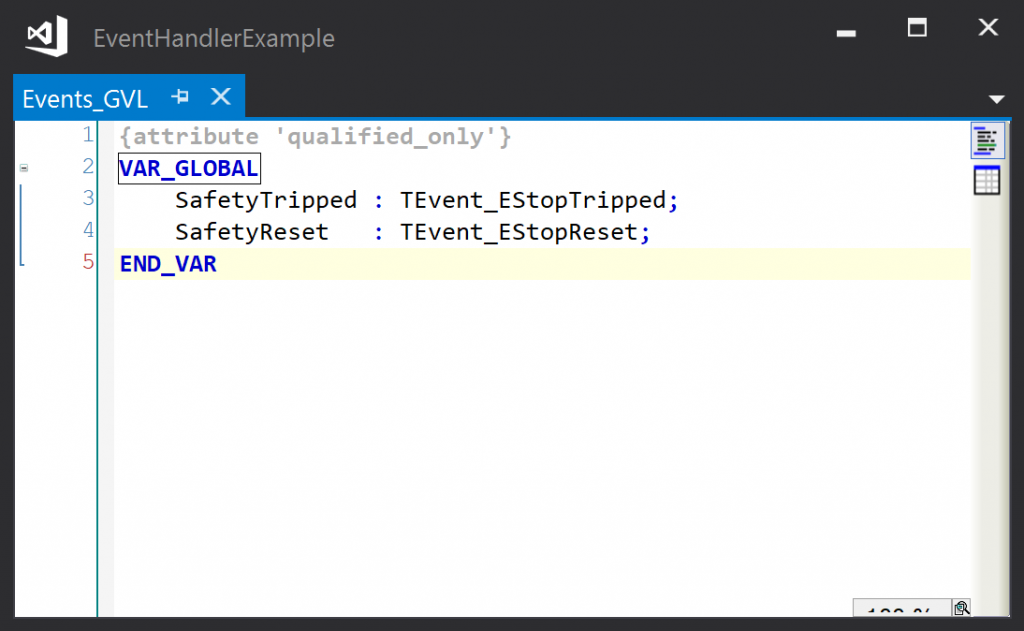
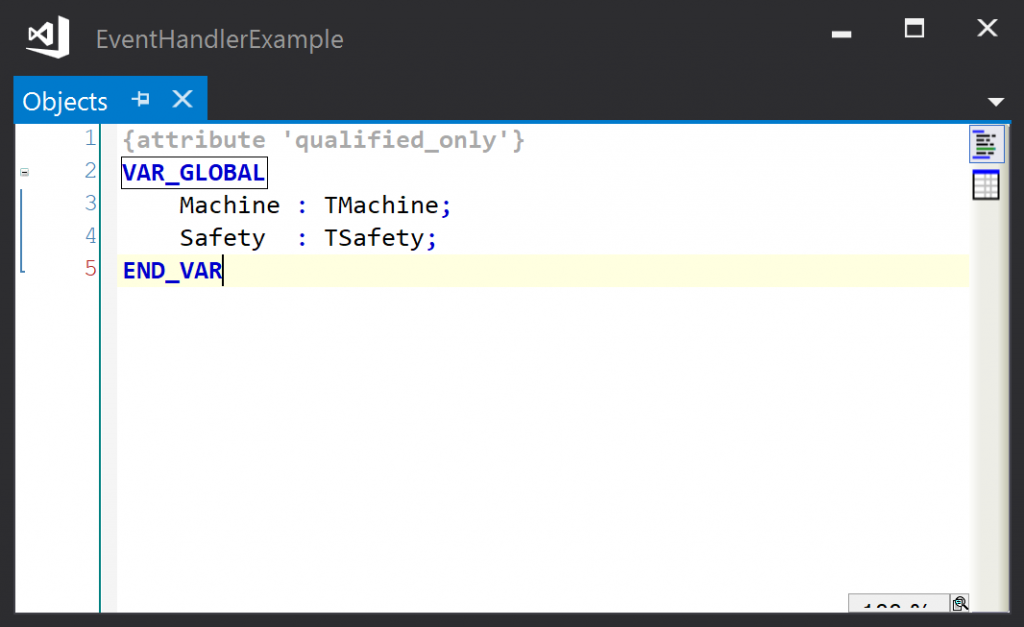
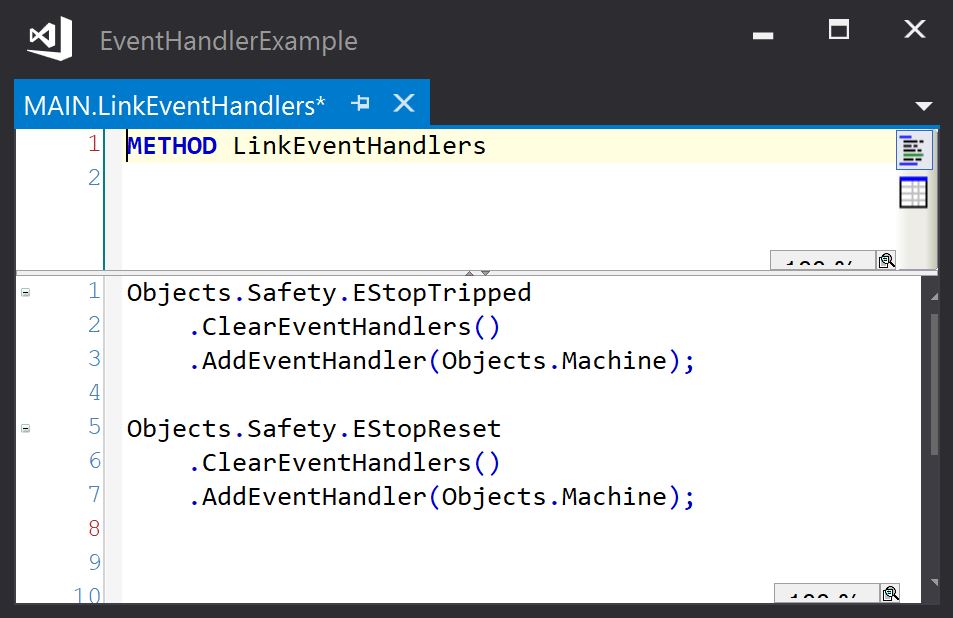
All that remains is to link the objects that must handle the events with the event instances. The simplest arrangement is to have a global list of events and a global list of objects:
Each event holds a list of registered event handlers that are called when the event is raised. The event base class has a method call ClearEventHandlers() that clears the list and a method call AddEventHandler() that adds an event handler to the list.
Note: These methods have a return type IEvent (which defines the ClearEventHandlers and AddEventHandler methods) so that we can chain method calls to improve the readability of the application code. Here adding event handlers to the defined events looks like this:
Raising Events
If the event instances are global, the events can be raised from any module:
The above code will result in the local EnablePower variable in Objects.Machine being set and reset as the state of the EStopHealthy input changes.
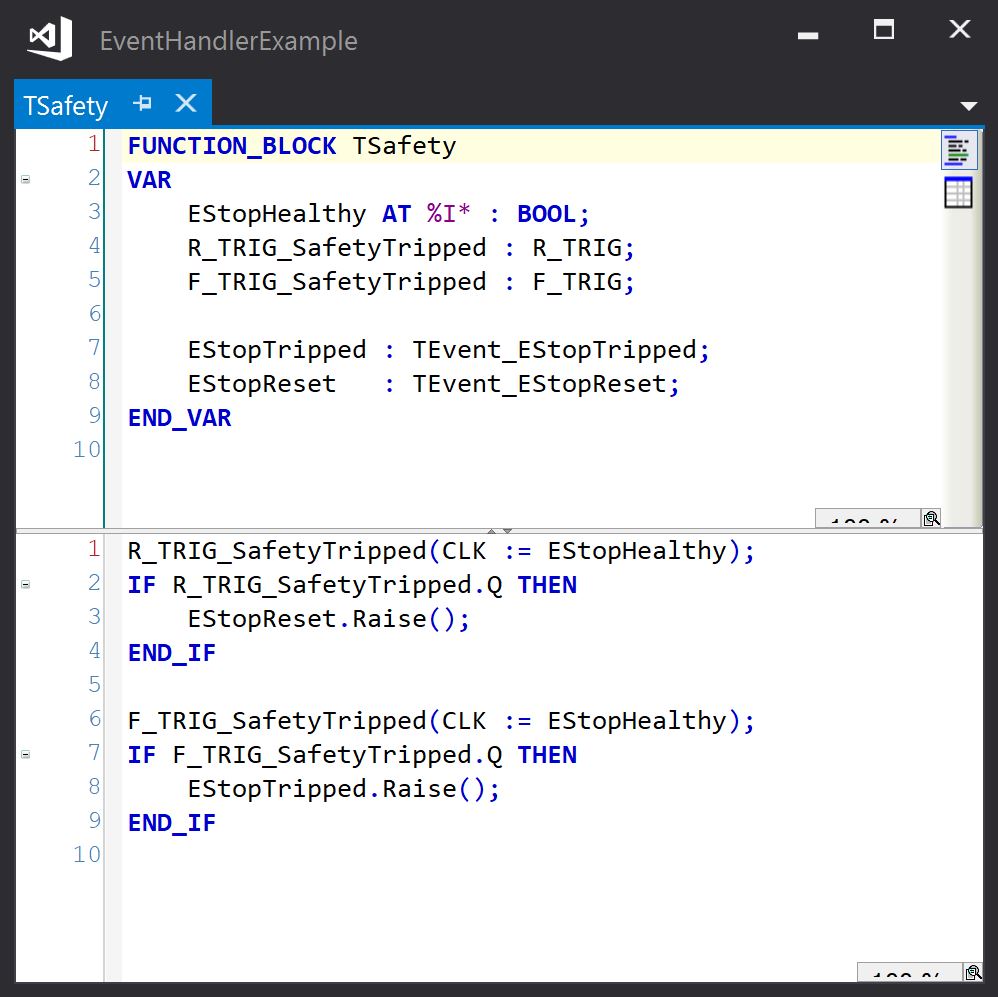
The events could also be declared as instance variables in the TSafety module:
The code that links the event handlers can reference the local instances directly 2:
Event Data
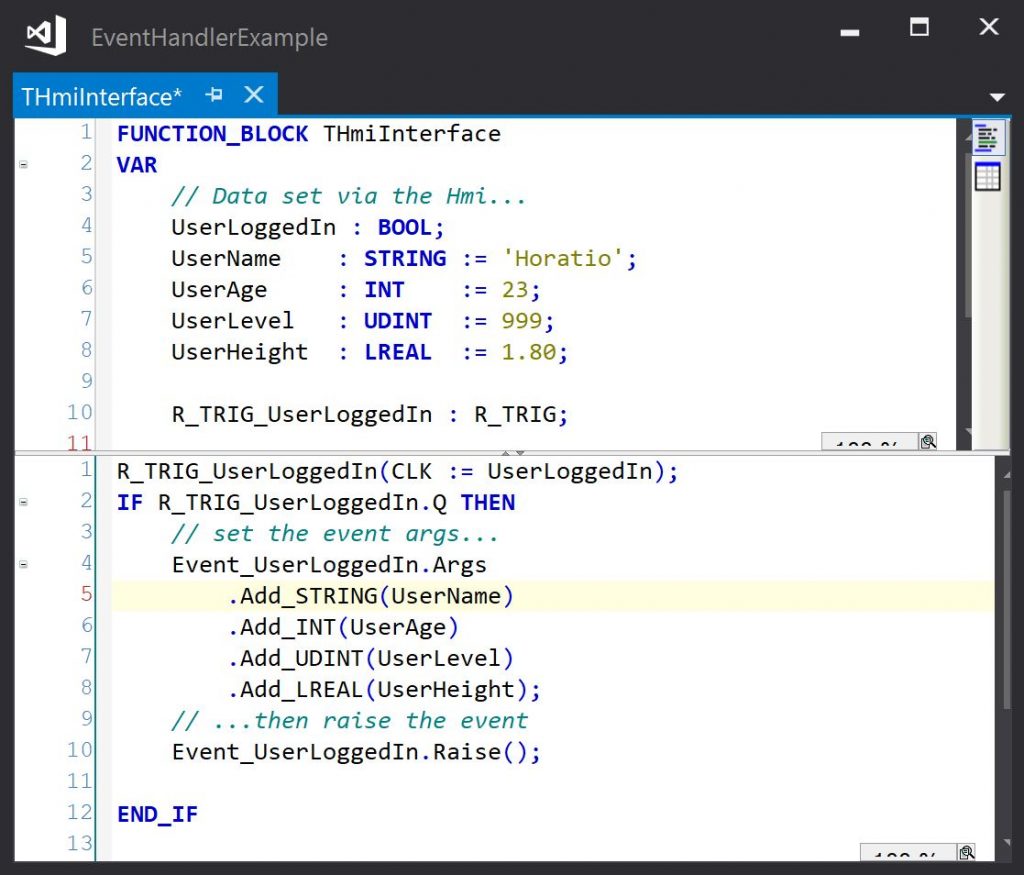
The event base class has an EventArgs object which can be used to pass event data from the object that is raising the event to the objects that are handling the event. Internally, the EventArgs is implemented as a resizable memory stream.
Event data is written to the EventArgs object using the following methods of the IStreamWriter interface implemented by the EventArg object:
Add_BOOL()
Add_BYTE()
Add_INT()
Add_UINT()
Add_DINT()
Add_UDINT()
Add_LINT()
Add_ULINT()
Add_REAL()
Add_LREAL()
Add_STRING()
Add_PVOID()
Each of these methods returns an IStreamWriter interface pointer, so if multiple arguments are to be added, the method calls can be chained. Arguments can be added in any order provided they are retrieved in the same order in the event handler.
So raising an event with event data might look like this:
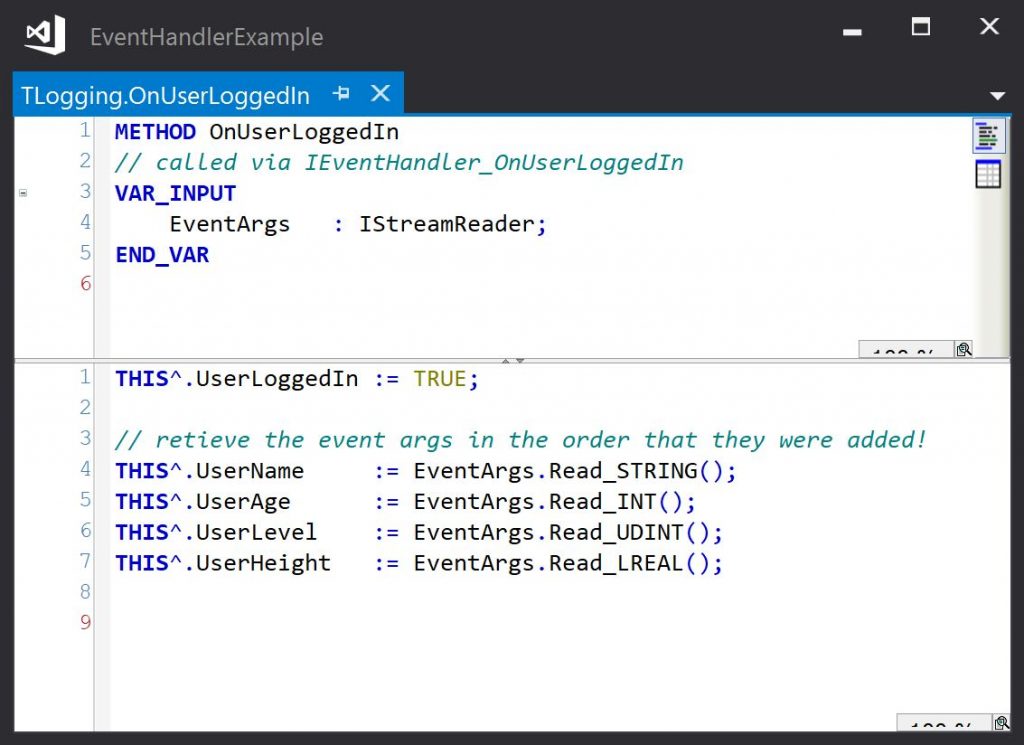
The CallHandler method of the event passes an interface pointer that points to the EventArgs object to the event handler method:
The event handler method uses this interface pointer to retreive the event data. Note that if multiple data items are passed in the EventArgs object, they must be retreived in the same order as they were added when the event was raised:
Summary
Events and handlers are easy to create, and the benefits of decoupling events from their effects can be enormous for large projects. Additionally, it opens the possibility of writing library classes that raise custom events that can be handled in client code.
There is no synchronisation between tasks here. If an object running in Task 1 raises an event on an object running in Task 2, there are no built in checks to prevent inconsistent data resulting from concurrent access. This must be done in the event handler using FB_IecCriticalSection or similar.[↩]
The local instances of events should not be accessible to the code that adds the event handlers (as they should be private). However, TwinCAT does allow this and it works (but the events do not appear in the intellisense menu unless it has been configured in TwinCAT Options to show all variables). If this offends you, you can add a public property of type IEvent that points to the local event instance, and use this in the code that adds the handlers. This is shown in the example project[↩]
This article is intended as guide to the adoption of object-oriented (OO) techniques in PLC programs written using structured text using TwinCAT3.
An example project showing some of these ideas in practice can be downloaded here
Background
TwinCAT is a programming tool provided by Beckhoff for programming their range of PC based controllers. TwinCAT3 is the latest version and supports 3 programming styles:
Procedural
A mix of procedural and object-oriented programming
Purely object oriented programming
Many PLC programs are difficult to understand and difficult to modify due to a high degree of coupling between modules and to informal communication paths between modules. This can be a result of the conflicting requirements of:
The high degree of interaction between different parts of a machine
The need to minimise coupling and dependancies between different parts of the program.
An object oriented approach offers a way of reconciling these requirements by allowing POUs to encapsulate behaviour and to exchange messages and in a consistent and well defined way.
However, when I first tried writing a program in a fully object-oriented style, I found it was not straight-forward. Creating the classes was easy – getting them to collaborate was hard. I think this is a natural consequence of the properties of objects that make them so useful – encapsulation.
This article will attempt to explain some of the techniques I have found minimise these difficulties.
Procedural Code
A procedural program will generally comprise the following
Programs – top level POUs that access global variables and call function blocks
Function blocks – POUs that accept inputs and drive outputs that are assigned when the function block is called. Function blocks may in turn contain function blocks and functions
The arrangement of function block calls and the messaging between function blocks is fixed by the program which has the advantage of being simple but the disadvantage of being inflexible. It works but we can do better.
Procedural/OO Mix
A half-way house to moving to a fully OO architecture is to use a mix of procedural and OO styles. The major building blocks of the program are still implemented as function blocks called by programs, but the smaller function blocks that provide services are implemented as classes. This can improve the readability of code by providing a fluent interface (Here is an interesting post on fluent interfaces in TwinCAT3 written by Gerhard Barteling).
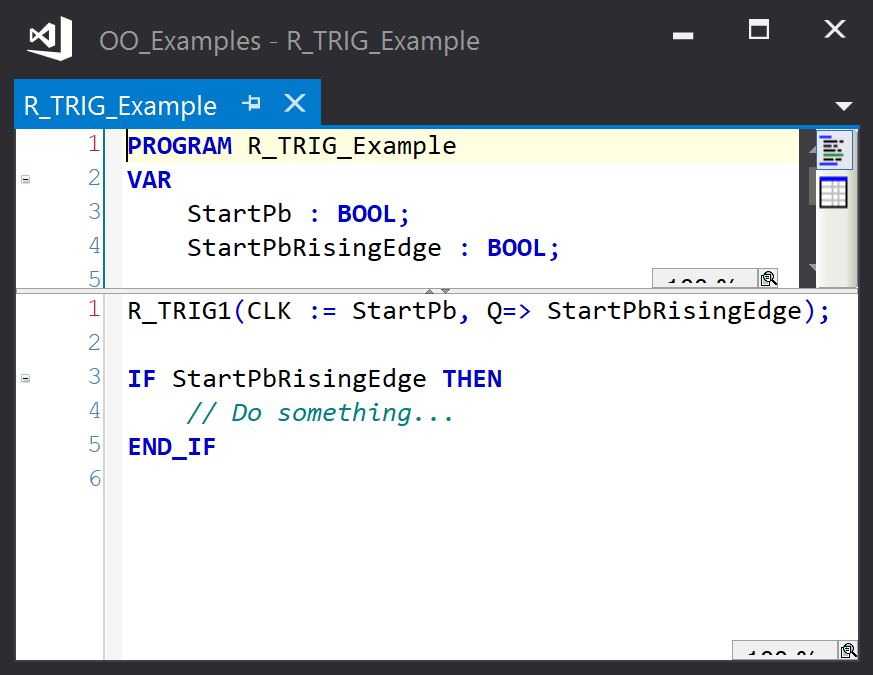
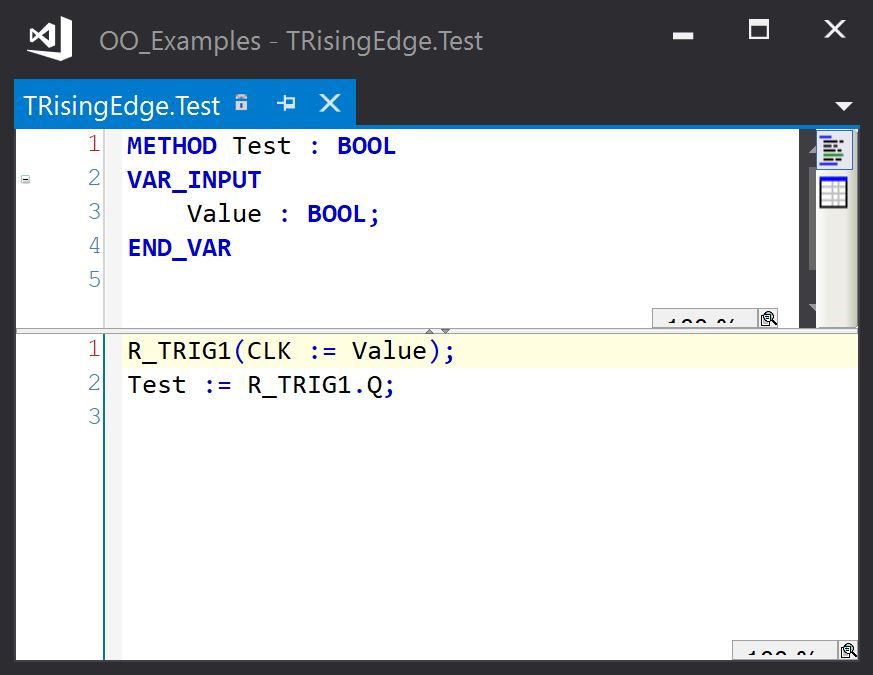
For example, the standard rising edge trigger function block can be used as follows:
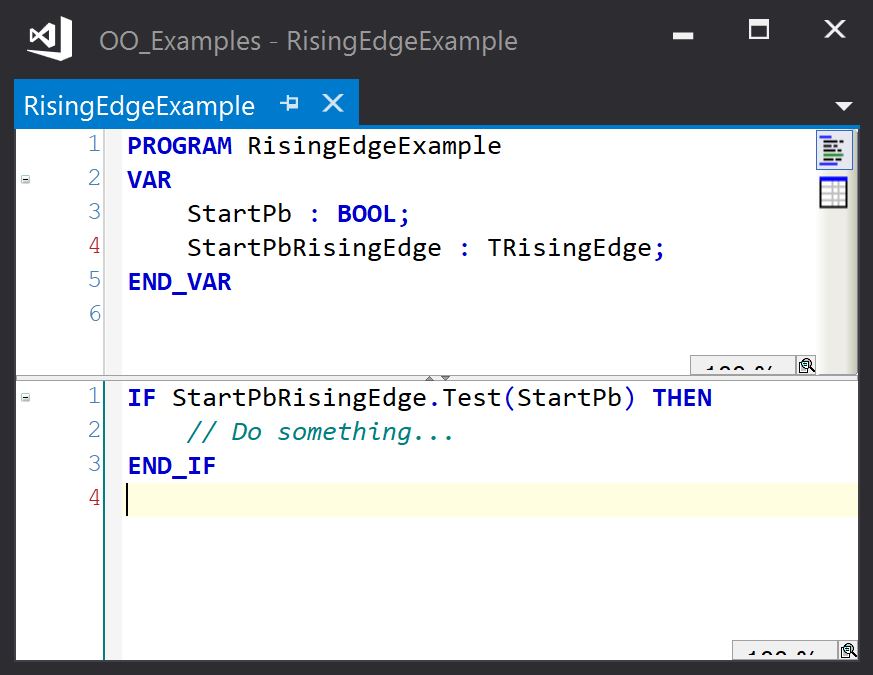
We can make this slightly easier to read by wrapping the R_TRIG in a class:
The TRisingEdge POU is a function block with a single method (Test):
This can be a useful way to introduce classes of gradually increasing complexity to a procedural program to get a feel for how objects can be used to present an intuitive interface to the client code, and hide the implementation details.
Fully OO Code
A fully OO program is one where all function blocks are implemented as classes – i.e they use properties and methods to provide interfaces to other objects. Classes are instantiated as objects that interact with each other to provide the required functionality.
So what are the guidelines that we can use to identify the classes we need? The best way that I have found is to think of a class as something with a single responsibility (or a small collection of closely related responsibilities). This quite often turns out to be the noun-based classes that are the traditional candidates for classes but it can also accommodate more abstract responsibilities such as parts tracking or alarm handling.
Provided these classes are kept small, implementing them can be fairly straightforward, as all the required information is held by the class in a well defined context. The class defines the operations required to handle it’s responsibility.
The class may carry out this operation during its cyclic execution, or it may allow other objects to invoke the operation as a service via a public interface.
The problem to solve is how to arrange the instances of these classes so that they can safely invoke each other’s services.
The Problems Of Ownership
The simplest case is where the client object (object requesting an operation be performed) owns a service object (object implementing the operation to be performed). In the rising edge trigger example shown earlier, the client object (RisingEdgeExample) asks the service object (StartPbRisingEdge : TRisingEdge) to use its Test methods to detect a rising edge and return true when one is detected. This works a treat, so why not use this all the time?
It only works if the client object is the sole user of the service object. This is generally the case for small classes such as timers and edge triggers, but not for larger classes that other clients may want to access.
If the service object is complex, it will need to hold its own service objects. This can result in a deep heirachy of objects, which should be avoided as it is difficult to change and difficult to navigate.
A better approach is to avoid nesting complex classes. Instead, assume all complex objects may need to be accessed by other objects, and instantiate them in a global object list. Provided the interface is carefully designed to ensure it is safe to use and cannot lead to an invalid internal state, there should be no problem making such an object globally accessible.
Referencing Shared Objects
If we have a global object list, any object can reference an other object by using its fully qualified name. Whilst this is reasonable for small programs, it should be avoided because:
A dependancy is created between the classes which makes the program harder to understand and change.
An instance of an object may not know which service object it is interested in where multiple instances of the service exist (such as where there are repeated machine elements, for example)
The alternative is to pass in a refence to the service object when the client object is called, either as a reference (using VAR_IN_OUT), or as an interface pointer (using VAR_INPUT) – also known as dependancy inversion.
Dependancy Inversion
Here, the VAR_INPUT parameter type is an interface. The service object must implement this interface so it can be implicitly converted when it is passed to the client during the call, and the interface must define the properties and methods to be used by the client so the client can use this interface pointer as if it were the service object itself
Thus, only the parts of the server object that are interesting to the client need be passed in. A benefit of this is that to test the client, a dummy class that implements the interface (a test double) can be passed in to remove the dependancy during testing.
Invoking Asynchronous Operations
Where a client wants to invoke an asynchronous operation on a service object (i.e one taking multiple scans with the possibility of the operation failing), a single method is not sufficient – one method is required to invoke the operation and another to query the current state of the operation. A third may be required to abort the operation under certain conditions (E-Stop, for example). In order to tie these methods together, an abstraction can be used that follows the command pattern.
Command Pattern
This pattern uses a command object to represent the the invocation of an asynchronous command. The command object is an instance variable of the service object. It implements an interface that is made public via a property of the service object that allows a client to start and abort the operation, and query the state of the operation.
The command interface has the following methods and properties:
Start() – A method to start the execution of the command
Abort() – A methods to abort the execution of the command
Clear() – A method to clear the results of the command
State – indicates the current state of the command.
Done – indicates that the last execution completed succesfully
Error – indicates that the last execution failed to complete successfully
ErrorId – error code relating to the reason the last execution failed to complete successfully
The possible states are:
Ready – not currently executing
Starting – a start command has been accepted, but execution has not begun
Busy – currently executing
Aborting – an abort command has been recieved so the command is terminating to leave the service object in a ready state
The command object implements the following methods that are used by the service object to update the State property
SetBusy()
SetDone()
SetError(ErrorId)
SetAborted()
Command Usage
The service object exposes the command interface as a property (Command). The client object holds a reference to this command interface (CommandInterface)
The client object invokes the operation by calling CommandInterface.Start(), which returns true if the start was accepted (i.e the state was ready)
The service object detects that the command state is starting and initiates the operation, calling Command.SetBusy() to set the state to busy
If the operation completes sucessfully, the service object calls Command.SetDone(), which sets Done property and sets the state back to ready
If the operation fails, the service object calls Command.SetError(ErrorId), which sets the Error and ErrorId properties, and sets the state back to ready
The client object monitors the command interface properties to determine the result of the operation, and act accordingly.
Command Benefits
The command encapsulates the interaction between the client object and the service object, reducing duplicated code by defining the ineraction once.
It creates a standard pattern across the program for how clients invoke operations on services, so a sequence of operations can be implemented by a state machine that sequentially calls Start() and checks Done or Error on a series of command interfaces
It supports both an ‘execute with feedback’ and a ‘fire and forget’ approach to triggering an operation. The former is useful in sequences where progress to the next step requires confirmation that the operation has completed. The latter is useful in response to manual commands where it is reasonable to ignore the command cannot be executed.
The client and the service become decoupled – the client no longer cares about the type of object that the service is, only that it has an interface that controls the invocation of the operation.
A description of an implementation of this pattern can be found here.
Further Decoupling – Domain Events
Domain events are an implementation of the observer pattern that allows an object to publish the fact that something has occurred to other interested subscriber objects (whose types are unknown to the publisher).
A domain event holds a list of objects that are to be notified when the event is raised. It has the following methods for updating this list:
ClearEventHandlers()
AddEventHandler()
The domain event has methods that allows the client to add event data and to raise the event:
EventArgs.AddInt()
EventArjs.AddString()
EventArgs.AddLreal() etc
Raise()
The raise method causes a method in each registered subscriber to be executed, with the EventArgs passed in for evaluation by this event handler method.
The main benefits are:
The removal of dependancies between the publisher and the subscriber.
The synchronous nature of the update – all subscribes are updated at the same time.
The ability to have many objects react to a single event in a one to many relationship
The ability to have many objects raise a single event in a many to one relationship
The cognitive decoupling that it allows between thinking about the event being raised and the event being handled.
A description of an implementation of this pattern can be found here.
Summary
The resulting architecture is based on a global list of small objects that interact using dependancy inversion, commands and events. Where the objects’ relationship is one-to-one, dependancy inversion or the command pattern are the best ways for them to communicate as this is easier to follow and understand than an event mechanism. Events are appropriate for one to many relationships (such as manual control events that must be handled by multiple objects) and many to one relationships (such as where many instances of the same class can raise the an event that must be handled by a single object.